


The Ultimate and Exhaustive Guide to Mastering Cannabis Drying: Perfecting Drying Room Conditions and Techniques
- 1. Introduction
- 2. Understanding the importance of proper drying
- 3. Chemistry of cannabis: cannabinoids and terpenes
- 4. Setting up the ideal drying room
- 4. a. Choosing the right space
- 4. b. Temperature control
- 4. c. Humidity control
- 4. d. Air circulation
- 4. e. Light control
- 5. Harvesting your cannabis plants
- 5. a. Determining the right time to harvest
- 5. b. Harvesting techniques
- 6. Trimming your cannabis buds
- 6. a. Wet trimming vs. dry trimming
- 6. b. Trimming tools and techniques
- 7. Drying methods and techniques
- 7. a. Hanging dry method
- 7. b. Rack drying method
- 7. c. Whole plant drying method
- 7. d. Alternative drying techniques
- 8. Monitoring and fine-tuning the drying process
- 8. a. Assessing drying progress
- 8. b. Adjusting drying conditions
- 9. Troubleshooting drying issues and challenges
- 9. a. Common drying problems and solutions
- 10. Curing your cannabis
- 11. Additional tips for drying and curing
- 11. a. Experiment with different drying methods
- 11. b. Maintain a clean drying and curing environment
- 11. c. Invest in quality monitoring equipment
- 11. d. Label and date your curing containers
- 11. e. Experiment with different curing times
- 11. f. Be patient and observant
- 12. Storage and long-term preservation
- 12. a. Choose the right storage container
- 12. b. Store in a cool, dark place
- 12. c. Maintain optimal temperature and humidity
- 12. d. Separate different strains
- 12. e. Use humidity packs
- 12. f. Rotate your stock
- 13. In summary
Introduction
Drying and curing cannabis are crucial steps in the cultivation process that significantly impact the quality, potency, and flavor of the final product. This ultimate and exhaustive guide will provide you with all the information and techniques needed to master the art of drying cannabis and setting up the perfect drying room conditions. We will cover topics ranging from the importance of proper drying and the chemistry of cannabis, to a variety of drying methods and troubleshooting common drying issues. So, let us help you find the right technique to dry cannabis buds.
Understanding the Importance of Proper Drying
Drying cannabis buds is a whole process on its own. Its purpose is to preserve the quality and properties of your cannabis so you can enjoy it for longer. Here why it’s important to dry the buds:
| Terpene Preservation | Mold and Mildew Prevention | Improved Flavor and Smoothness |
|---|---|---|
| Preservation of volatile compounds | Removes moisture | Breaks down chlorophyll |
| Preservation of scent and flavor | Prevents growth of mold and mildew | Reduces harshness |
Chemistry of Cannabis: Cannabinoids and Terpenes
You can enjoy the effects and taste of cannabis thanks to two main compounds: terpenes and cannabinoids. THC and CBD (cannabidiol) are responsible for the way your body and mind feel when smoking or consuming cannabis derived products. They work in relation to your own body’s endocannabinoids and create these effects. The terpenes, on the other hand, are the ones that keep the aroma profile and offer unique flavors along with some therapeutic properties. The main point of drying is to keep the compounds intact so you can benefit from all the effects.

Setting Up the Ideal Drying Room
Generally, a drying room would be best for properly drying cannabis buds due to the amount of control you can have on the environment. But let’s see what it actually takes to make a great drying room:
Choosing the Right Space
Many growers have a specific space designed solely for drying cannabis and some of the most common places are grow tents, closets and basements. However, you should be aware that the most important aspect is making sure your drying room has the right size for your harvest. You want to allow air to move without any restrictions.
Temperature Control
The optimal temperature in a drying room is usually kept at 15 to 21°C (60 to 70°F). This range is great for maintaining the same quality in terms of flavor and aroma of the terpenes, as well as avoiding mold development. Some of the tools usually used in such spaces are air conditioners for cooling, heaters for rising the temperatures when it gets too cold and devices that will help you monitor the levels of temperature and humidity in the room.
Humidity Control
Generally, growers keep the ranges for humidity at around 55 to 60%. These measurements allow the buds to dry properly without allowing mold growth. A great tool that will help you track the levels of humidity is a hygrometer along with dehumidifiers and humidifiers depending on the case.
Air Circulation
Air circulation is essential in cultivating cannabis plants particularly because the flow allows your plants to be evenly aerated. Moreover, using some oscillating fans, you ensure air doesn’t get directly onto the buds. Don’t forget also about exhaust and intake fans that permit a good flow of air while also keeping the humidity in check.
Light Control
Too much light can be harmful for your buds, especially because it can affect both the cannabinoids and the terpenes. This will result in a product less potent and a flavor profile less appealing. That’s why it’s important to keep the buds as far away as possible from light. You can do this by purchasing a light-proof tent or blackout curtains, however, a room with opaque walls should be just as good.

Harvesting Your Cannabis Plants
Harvesting is just as important as any other step when it comes to cultivating cannabis. Apply the right techniques to set yourself on the right foot before you begin the drying process.
Determining the Right Time to Harvest
The trichomes usually give away when it’s time to make a cut. The first signs are in the color. Usually located near the sugar leaves, you’ll need a magnifying tool to properly see and identify if it’s time to harvest. You’ll recognize that the buds will change from clear to cloudy (peak THC production) and after some time to amber (high CBN content).
If you wait longer to harvest your buds, then you’re usually in for a stronger effect that can turn slightly sedative and relaxing.
Harvesting Techniques
Once you’re sure your plant is ready to harvest, then get ready to choose among two methods:
- Whole Plant Harvest
- Branch-by-Branch Harvest
The first method means cutting the plant directly at the main stem. While it might seem easier, you’d have to dispose of professional tools that help maintain the same levels of humidity and temperature, thus, avoiding risks of molding.
The second method is much more beginner friendly and doesn’t require many resources. This is recommended for bigger cannabis plants when you plan to hang the branches up or place them on a drying rack. It’s an ideal method to use in high humidity levels.
No matter whichever method you use, always use clean cutting tools and cut directly so you don’t damage the plant further if you plan on leaving other branches to grow.

Trimming Your Cannabis Buds
If you don’t properly trim your buds from the sugar leaves you risk affecting the final flavor profile and potency, but also the appearance. But how do you trim your buds and what are the best methods to do so?
Wet Trimming vs. Dry Trimming
Wet trimming and dry trimming are some of the most widespread techniques but there’s some differences:
- Wet Trimming: When wet trimming, the leaves are more rigid so it’s easier to cut. The higher levels of moisture facilitate the cutting process and also prevents the development of mold and mildew.
- Dry Trimming: When you’re dry trimming, chances are that your buds will lose some terpenes if you are not experienced. Be cautious when you dry trim and don’t rush through it.
No matter the technique, use the technique that better fits your preference. In the end, a well equipped growing and drying room are much more influential on the quality of your buds.
Trimming Tools and Techniques
Trimming and cutting tools are usually a point where you should splurge a little. Curved scissors or a good set of pruning shears can help you greatly when you need to cut the buds. Also, you’re going to need a trimming tray to contain the buds you cut and gloves to avoid contamination.
The cutting and trimming process is not as complicated as it seems, but it does require attention and dexterity:
- Remove the fan leaves by supporting the stem and cutting. You can do that either by using your fingers or a trimming tool.
- With clean scissors, cut the sugar leaves. Once you have complete access to the buds, trim them as close as possible making sure you don’t damage it.
- To be sure you’re cutting evenly, rotate the buds.
Put the buds you’ve just trimmed on a tray or on a drying rack.
If you are producing high quantities of cannabis buds, then make your life easier and use a mechanical trimmer. The buds might look a little rougher, but you’d speed up the process.
Drying Methods and Techniques
You won’t find a universal drying technique that works for any type of environment, but you should definitely experiment and try to find the best one for your environment.
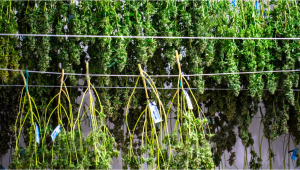
Hanging Dry Method
When you hang the plant, the airflow travels much easier, thus ensuring an even dryness of the buds. You can use a line, wires or a rack where you simply put the plants in a position where they don’t touch each other.

Let’s see how it actually works when you hang your plants:
- Don’t even start cutting if your dry room is not ready. Adjust the temperature, the humidity and remove direct light sources.
- Turn the cannabis plants upside down and put them on the line.
- During the drying process, check on your plants daily to catch any possible mold or disease.
- Expect your buds to be ready after 7 to 16 days of drying.
Rack Drying Method
This method is ideal for smaller harvests because you can put the buds directly on a mesh or a rack and leave them to dry. If you have small harvests or you don’t dispose of much space then this method is what you’re looking for.
- Get the room ready for your harvest.
- Put your buds on the drying racks and don’t let them touch eachother. Spread them evenly so they dry all the way and avoid any mold development.
- Don’t forget to check on your plants at least once a day.
- In 7 to 10 days your buds should be dry enough to move to curing.
Whole Plant Drying Method
In some cases you don’t even need to cut your plant if your variety is small enough. It’s the same process as the hanging method, only you won’t have to trim it even more. The advantage of trimming the whole plant is that you won’t risk losing valuable terpenes.
- The usual step when getting into the drying process, set up your room first.
- Place your plants upside down on a hanging line of your choosing and make sure your plants aren’t in contact with each other.
- Enter the drying room at least once a day to check on your plant.
- If you’re drying the whole plant, give it from a week to 16 days before moving to your next step.
Alternative Drying Techniques
Drying cannabis buds can be quite flexible if you want to experiment with other methods.
- Paper bags have frequently been used in cannabis preparation so naturally, they’re also quite useful in drying the buds. Often used for smaller harvests, just add the buds in a bag and leave it somewhere cool, dark and with good ventilation.
- The freeze drying method is both efficient, and expensive. The buds will dry swiftly and you’ll keep a considerable amount of terpenes. But it’s not a necessity as long as there are more affordable options.
- A simple method, desiccant drying is adding silica gel or calcium chloride in the container you use for storing. Buds dry faster with this technique, but you’ll have to be careful not to ruin them in the process.

Monitoring and Fine-Tuning the Drying Process
Monitoring your plants and your bud’s development is crucial if you want to experience the best of your strain. Remember that you can always make adjustments and modifications if your buds don’t dry as expected.
Assessing Drying Progress
Learning when it’s the best moment to move from the drying process to curing.
- If you’re not sure when your plant it’s ready to harvest, then try snapping the stem to check the plant’s dryness. When your plant doesn’t break or if it breaks completely, without any fibres attached, then it’s too dry.
- Another way to recognize if your plant is ready is by checking the texture of the buds. If when you touch them you feel them dry, but not brittle, then they’re ready.
- As the chlorophyll starts breaking down, the aroma and flavor of your buds starts giving you a preview for what follows. When you no longer start feeling the gassy smell, your buds are ready.
Adjusting Drying Conditions
Sometimes things don’t go as planned and you might need to adjust your drying space to make sure your plants are not affected by diseases or bad drying.
- Keep track of how long it takes your buds to dry. If it’s too quick, then lower the temperature, if it’s too slow, increase the degrees.
- Generally, if you keep your room at 60 to 70°F or 15 to 21°C, you should be good.
- If you start noticing any signs of mold, then it’s time to adjust the humidity levels from the drying room. The optimal range is between 45 and 55% RH.
- Improved air circulation will help prevent mold and uneven drying of the buds. That’s why, in case you see any signs of mold, try increasing the air flow so your buds start drying faster.
- When your buds are going through the drying process don’t forget to leave them in complete darkness where light cannot penetrate.
Mold and mildew are about the only things that can impact your buds to the point of not recovering. In case you notice mold on your cannabis buds, throw them away and check your other plants from your harvest.

Troubleshooting Drying Issues and Challenges
Your level of experience with cannabis drying doesn’t mean you won’t hit a wall sometimes.
Common Drying Problems and Solutions
- Many growers had to deal with moldy buds that made them throw away big chunks of their harvest. To avoid having to deal with it, keep the room clean and track the temperature and humidity inside the room. This also applies to mildew.
- If you don’t have a good ventilation system in place, you’ll encounter issues like uneven drying of your buds. This issue can be solved if you catch it early and adjust the room’s measurements. However, if your buds are way too dry, then add a few slices of fruit in the jar and in a few hours you should have the humidity back at the right place.
- Avoid direct contact with light so you don’t lose potency and flavor from your buds. A dark room along with a storage space away from the sun will make your buds keep their qualities.
- Sometimes it can happen to dry your buds too much and think that all it’s lost. Luckily, you can bring some moisture back on by adding some lemon or orange slices in the jar and leave it for a few hours.Also, don’t forget to adjust the room’s measurements. This should bring some moisture back.
- The same applies for buds that dry slower than expected. Make adjustments to the temperature, humidity and air circulation. Still, don’t rush it because it’s important to give your buds the time to properly dry.
Curing Your Cannabis
The curing stage is the step where your buds finally develop the full flavor, aroma and potency profile. Now, your buds will break the rest of the chlorophyll and other compounds. Here’s how you can cure cannabis buds:
- In a glass jars add your buds up to ¾ full. No more than that because if the container is too full, there won’t be enough space for air exchange.
- Keep track of the environmental measurements in the curing space. Ideally, you’d maintain the space at a temperature of 60-70°F or 15-21°C. Track the humidity with a hygrometer and be sure the range is around 58 to 62% RH in the jar.
- The first week of curing requires daily checking and opening of the jar to allow an airflow exchange where the excess moisture exits the jar and fresh air enters the jar. You should do this if the humidity levels in the jar are over 65% and for no more than 10 to 15 minutes.
- Once the first curing week is over, you can slow down the burping to one time every few days. After that time, you can tone it down to once every few days.
- Curing your buds shouldn’t take any less than two weeks. In fact, when you cure buds, the longer you do it, the better the flavor and potency
Additional Tips for Drying and Curing
You can actually go a step further and try to improve your curing and drying processes to a new level.
Experiment with Different Drying Methods
Drying cannabis buds is not a process set in stone and you should feel free to experiment and try out whatever works better for your space and buds.
Maintain a Clean Drying and Curing Environment
Your drying room should always be clean, and that includes keeping the ventilation system clean to avoid the spreading of diseases, pests and infections.

Filters such as HEPA make sure that also the air for your buds is clean and free from any type of damaging factors.
Invest in Quality Monitoring Equipment
High-quality devices will help you keep track of all the modifications in the environment. Being able to catch any spikes in temperature, humidity and air quality will help you offer your buds the best chances to dry evenly. Start with getting a thermostat, a hygrometer and a good AC.
Label and Date Your Curing Containers
Your stash should be as organized as possible so don’t skip on writing labels for your jars. Generally, the label includes the date when you started curing, the name of the strain and the amount.
Experiment with Different Curing Times
While the minimum curing time is about two weeks to one month, some strains require more time. Try to experiment and see what’s the best amount of time that will make your buds be as delightful as possible.

Be Patient and Observant
Creating the perfect buds is a patience game. During drying and curing, try to avoid rushing the processes unnecessarily so you don’t get low quality productions.
Storage and Long-term Preservation
Cured cannabis can be stored for a long time if you want to enjoy it for longer. The main purpose of good storage is to maintain the full quality of the buds along with their potency, flavor and aroma.
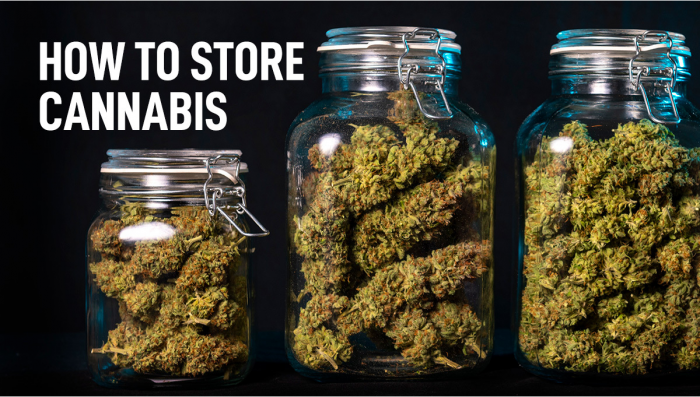
Choose the Right Storage Container
The first thing to avoid when storing cured cannabis buds are any shape or form of plastic containers (this includes jars and plastic bags). Choose a glass container that’s airtight, light proof and not reactive to materials. If you want to buy one container, you can find on the market storage containers designed for buds.
Store in a Cool, Dark Place
Light is one of the main factors that causes damage to your buds due to the degradation that happens to the terpenes and cannabinoids. Moreover, UV light in particular, the light lowers the potency and modifies the flavor profile.

A dark place, with cool temperatures where light can’t get in is ideal. A cupboard, a cabinet or a drawer should do the trick.
Maintain Optimal Temperature and Humidity
During the drying and curing processes, cannabis buds prefer a stable environment so it’s important to maintain temperatures and humidity at the same levels throughout the process. Harsh fluctuations will have a negative impact on the quality of your terpenes and on the flavor.
Separate Different Strains
Avoid placing different strains together because you risk contamination. Another important thing is that you won’t mix up the flavors and aroma.
Use Humidity Packs
To keep your humidity in check try using Boveda packets, silica beads or Integra Boost to maintain the environment stable.
Rotate Your Stock
To keep your stash fresh for longer, use the oldest buds first. This way, your stock will always have high quality buds ready to go. Also, don’t forget to add the date on the storage jars so you always know the status of your buds.

Frequently Asked Questions
If you’re still not sure or you have doubts, then check out some frequently asked questions about drying and curing cannabis buds.
How long does it take to dry cannabis?
The drying time of the buds usually depends on their size. So, it can take from one week to three weeks if we take into account the drying method you use, and the environment.
How long should I cure my cannabis?
You should aim to cure your cannabis buds for at least two to four weeks. However, if you can, you should try to wait as much as possible to allow your buds to develop a tastier flavor and aroma along with better potency.
How do I know when my cannabis is fully dried?
The stem should tell you when your cannabis buds are ready for the next curing stage. If it’s dry to the touch and it snaps when you bend it while the fibers are still attached, then it’s good to go. If it doesn’t break or it crumbles, then it’s too early, respectively too late.
What happens if I don't cure my cannabis?
Uncured cannabis buds can be smoked but you won’t taste the full aroma profile. Also, the potency will not be as developed so you won’t enjoy the beautiful buds at their full potential.
Can I speed up the drying process?
Technically, you can speed up the process but these options can have a negative impact on the final quality of your buds. Try out a few methods using a small sample of buds to see if they’re a good fit for you.
In Summary
Don’t let drying and curing scare you away from enjoying the best cannabis buds possible. As long as you’re careful with the measurements, you cut off the light and you’re giving it time, there’s no reason to be overwhelmed by these stages.


Comments